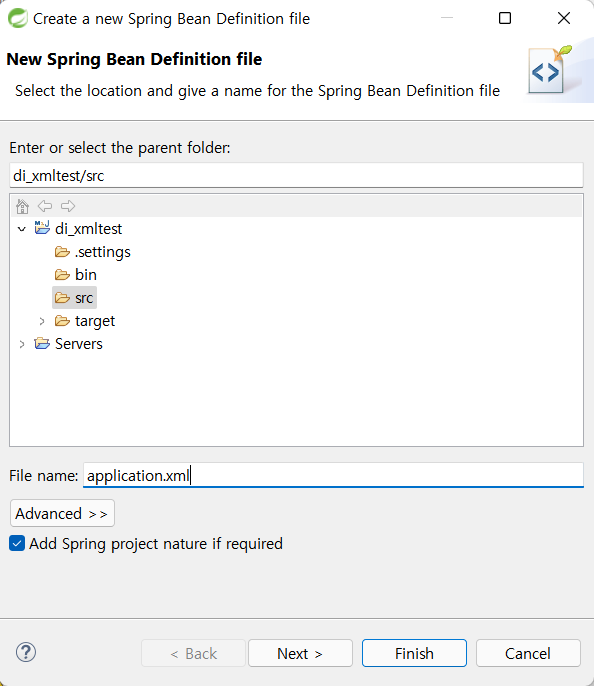
1. 객체(Bean) 등록할 XML파일 생성하기
src 우클릭 > [New] > [Spring Bean Configuration File]

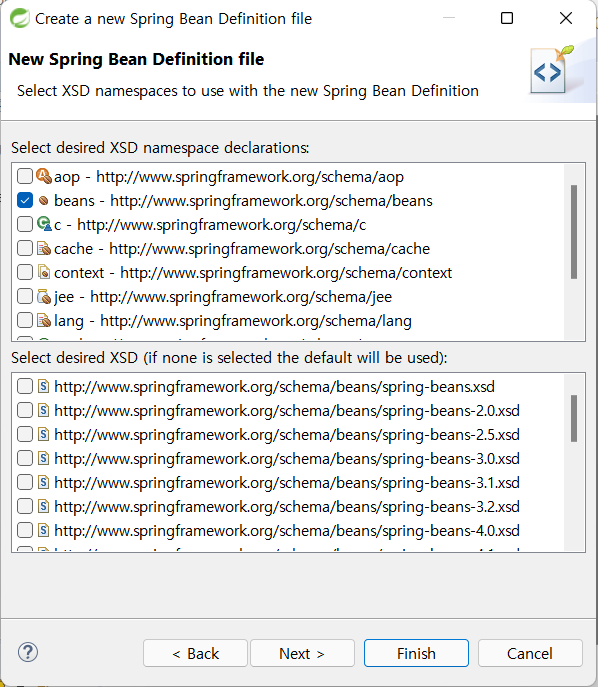
파일 이름은 보통 application.xml을 사용한다. [Next] > beans 선택 > [Finish]
2. Container에 등록할 객체 설정하기
XML에 사용하는 태그에 대한 설명은 아래 [더보기]를 클릭해서 볼 수 있다.
*XML에 사용하는 태그 설명
| 태그명 | 설명 | ||
| <beans> | Root tag로, 이 태그의 body안에 모든 내용을 작성한다. *xmlns = ".../beans" = 원래 <beans:bean>로 작성해야 하는데, beans는 앞에 아무것도 안쓰는 것으로 설정하는 것이다. 따라서 <bean>으로 작성하면 된다. |
||
| <bean> | Spring Container가 관리할 객체 설정 | name | 주입 받을 곳에서 호출할 이름 설정(중복값) |
| id | 주입 받을 곳에서 호출할 이름 설정(유일값) | ||
| class | 관리할 객체의 클래스 | ||
| scope | Bean 생성 범위 1) singleton(default) : 스프링 컨테이너당 1개 2) prototype : 요청할 때마다 새로 생성 3) request : HTTP Request별로 1개 4) session : HTTP Session별로 1개 |
||
| init-method | 객체 생성 시 호출 할 초기화 메서드 등록 | ||
| <property> | Bean의 property 설정 | ||
| <constructor-arg> | Constructor(생성자)의 인자값 설정 | ||
xml에 객체를 설정하는 방법은 <bean>을 이용하면 되며, init-method를 이용해 초기화 메서드를 설정해줄 수 있다.
<!-- application.xml -->
<bean id="d1" class="com.test.di1.TestDaoImpl1" init-method="init"></bean>
객체 간의 의존 관계를 설정하는 방법에는 2가지가 있으며, 완성된 코드도 이에 따라 2가지로 나눠 작성하였다.
[방법1] Setter & Property 이용
1) Setter 생성
//TestService.java
package com.test.di1;

public class TestService {

	private TestDao td1;
	private TestDao td2;

	public TestService() {
		System.out.println("TestService 생성자!");
	}

	//td1의 setter
	public void setTestDao1(TestDao testDao) {
	    this.td1 = testDao;
	}

	//td2의 setter
	public void setTestDao2(TestDao testDao) {
	    this.td2 = testDao;
	}

	public void TestPrint() {
		td1.testPrint();
		td2.testPrint();
	}
}
2) 설정 파일에 의존 관계 설정하기
setter를 이용해 의존 관계를 설정할 때는 <property> 태그를 사용하며, 각 속성들은 아래 표에 정리하였다.
| 속성이름 | 값 |
| name | property 이름 *setter, getter에 있는 이름에서 첫 문자를 소문자로 한 것이 property가 된다. ex) setTestDao1 => testDao1 |
| ref | 참조형 값 ex) List, TestService 등 객체 |
| value | 기본형 값 ex) int, String 등 |
<!-- application.xml -->
<?xml version="1.0" encoding="UTF-8"?>
<beans xmlns="http://www.springframework.org/schema/beans"
	xmlns:xsi="http://www.w3.org/2001/XMLSchema-instance"
	xsi:schemaLocation="http://www.springframework.org/schema/beans http://www.springframework.org/schema/beans/spring-beans.xsd">

	<bean id="ts" class="com.test.di1.TestService">
		<property name="testDao1" ref="d1"></property>
		<property name="testDao2" ref="d2"></property>
	</bean>
	<bean id="d1" class="com.test.di1.TestDaoImpl1" init-method="init"></bean>
	<bean id="d2" class="com.test.di1.TestDaoImpl2"></bean>
</beans>
+) namespace를 이용한 property 설정
설정 파일 application.xml의 아래에 [Namespaces]를 클릭해서 p를 추가로 선택해준다.
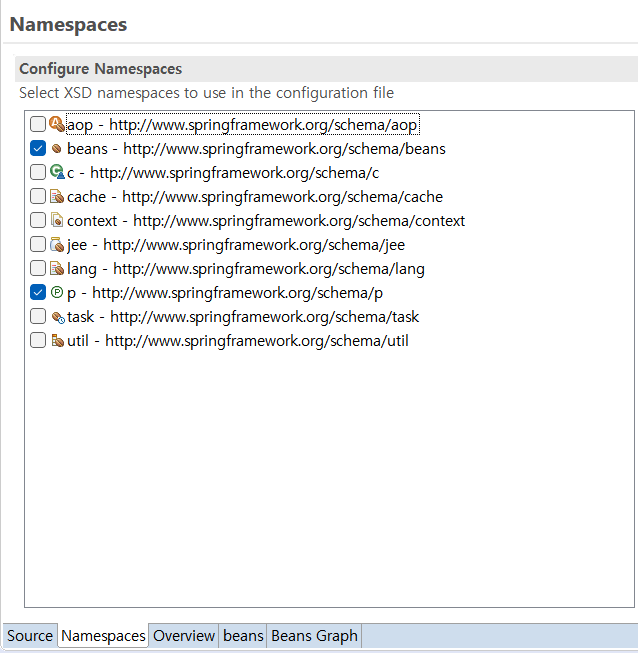
다시 [Source]로 돌아가서 <property> 태그 대신 간단하게 작성할 수 있다.
<bean id="ts" class="com.test.di1.TestService"
    p:testDao1-ref="d1"
    p:testDao2-ref="d2"
/>
[방법2] Constructor 이용
1) 생성자 수정
코드에서 'String command' 변수를 굳이 인자로 받은 이유는
참조형 객체외에 int, String과 같은 값을 받아올 때도 살펴보기 위해서다.
//TestService.java
package com.test.di1;

public class TestService {

	private TestDao td1;
	private TestDao td2;

	public TestService(String command, TestDao testDao1, TestDao testDao2) {
		System.out.println(command);
		this.td1 = testDao1;
		this.td2 = testDao2;
	}

	public void TestPrint() {
		td1.testPrint();
		td2.testPrint();
	}
}
2) 설정 파일에 의존 관계 설정하기
생성자의 인자에 주입함으로써 의존 관계를 설정할 수 있다.
<constructor-arg> 태그를 이용하는데, 속성들은 위의 <property>태그 속성과 같다.
<!-- application.xml -->
<?xml version="1.0" encoding="UTF-8"?>
<beans xmlns="http://www.springframework.org/schema/beans"
	xmlns:xsi="http://www.w3.org/2001/XMLSchema-instance"
	xsi:schemaLocation="http://www.springframework.org/schema/beans http://www.springframework.org/schema/beans/spring-beans.xsd">

	<bean id="ts" class="com.test.di1.TestService">
		<constructor-arg value="TestService 생성자!"/>
		<constructor-arg name="testDao1" ref="d1"/>
		<constructor-arg ref="d2"/>
	</bean>
	<bean id="d1" class="com.test.di1.TestDaoImpl1" init-method="init"></bean>
	<bean id="d2" class="com.test.di1.TestDaoImpl2"></bean>
</beans>
'Programming > Spring' 카테고리의 다른 글
| Spring (3) - Container에 객체(Bean) 설정하기4 : Java (0) | 2022.04.23 |
|---|---|
| Spring (3) - Container에 객체(Bean) 설정하기3 : Annotation (0) | 2022.04.23 |
| Spring (3) - Container에 객체(Bean) 설정하기1 : 프로젝트 생성 (0) | 2022.04.22 |
| Spring 기타(1) - 객체 간 결합도가 낮은 이유 (0) | 2022.04.20 |
| Spring (2) - IoC와 Container (0) | 2022.04.20 |